Client Portal
What can the customer see, and what can it be used for?

BoothBook
Last Update 2 anni fa
Each of your customers can access their bookings details (and so much more) through their client portal. They log into this via the Manage Booking section on the front page of your BoothBook, using their Booking ID Number and their Last Name, or through the Manage Booking widget that you can add to your website.
What can my customer use the client portal for?
In their client portal, your customers can do the following, based on what you've enabled.
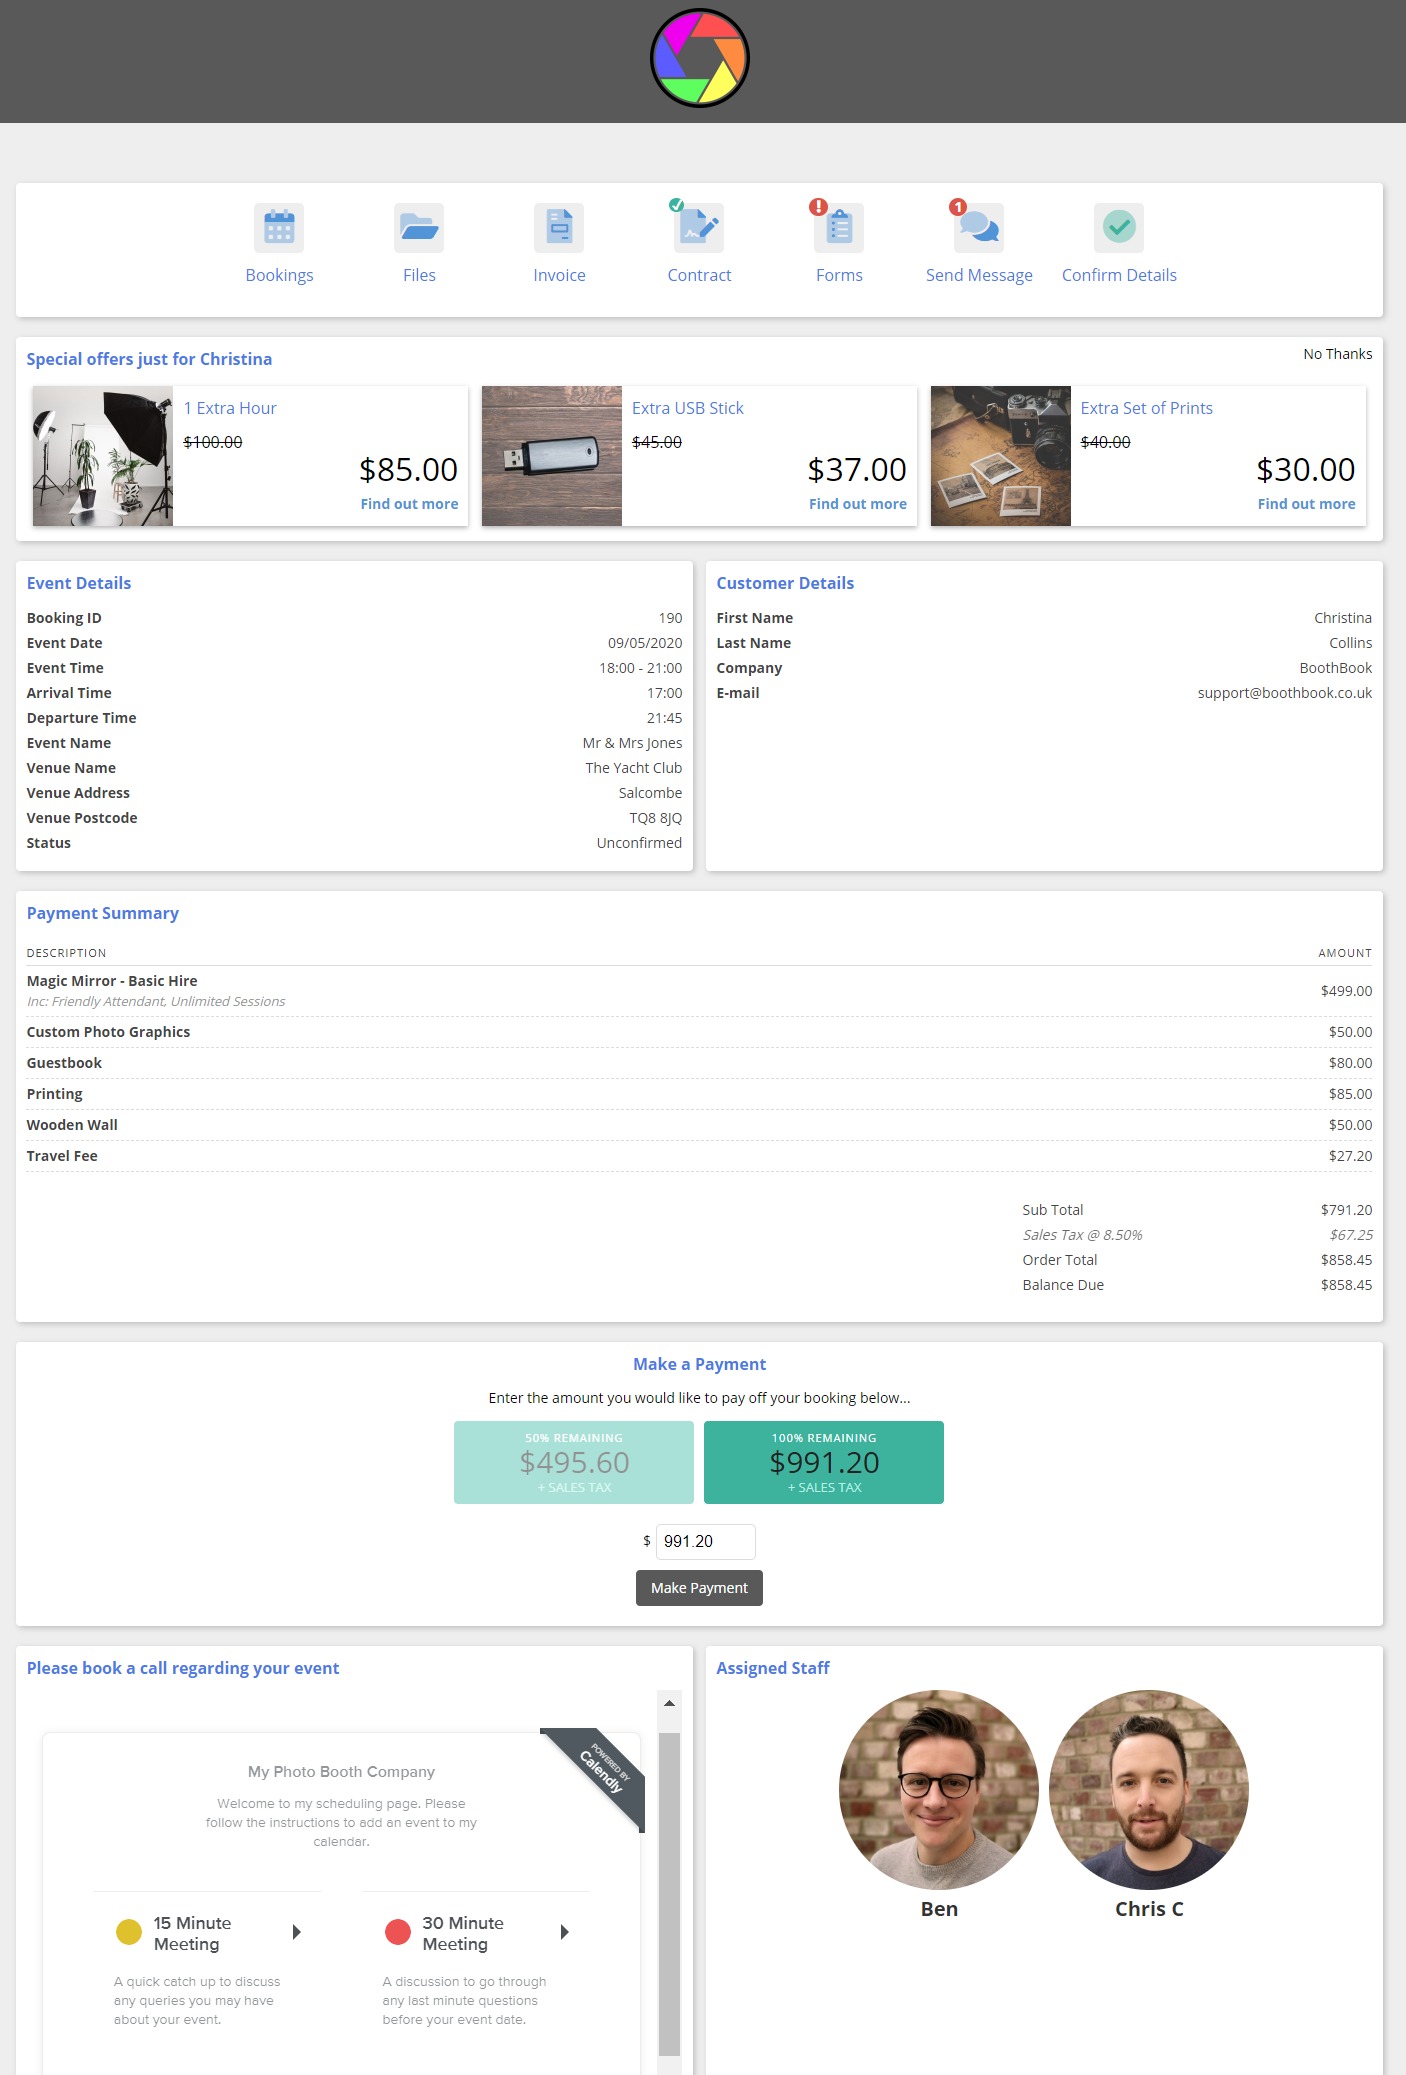
- View booking details contact, event and venue information.
- View their updated payment summary, including all tax breakdowns (if applicable)
- View and complete your Webforms (Questionnaires/DJ Song Choices/Surveys etc)
- View chosen packages, extras and any additional travel costs for your event.
- Purchase additional products for their event from your up-sells. See more about up-selling Extras
- Choose whether to enable or disable their contact permissions (for marketing purposes)
- View and download files such as Public Liability Insurance.
- View and download their invoice - see more about Invoice Settings
- View, sign and download their contract - see more about Contract Settings
- Choose their template from BoothBook or External Template chooser - see more about the Template Chooser
- Start or continue a conversation with Admins via a messaging thread
- Review their custom artwork
- View the assigned staff for their event.
- Make part or full balance payments using different cards and/or methods. (Optional setting: only once the contract has been signed)
- View other bookings associated with their email address.
- Click Confirm Details
- Leave a review on a variety of platforms, after their event date has passed.
How Can I Customise A Client Portal?
Our recent update to the Client Portal now allows you enable, disable and rearrange certain content blocks. These changes are global and will be reflected for all of your clients. To start configuring, click each title to expand the content block.
To begin, head to the Top User Menu > Settings > Client Portal
- RE-ORDER CONTENT BLOCKS
- ENABLE / DISABLE CONTENT BLOCK
- FULL WIDTH / HALF WIDTH VIEW
- ADDITIONAL CUSTOM BLOCKS
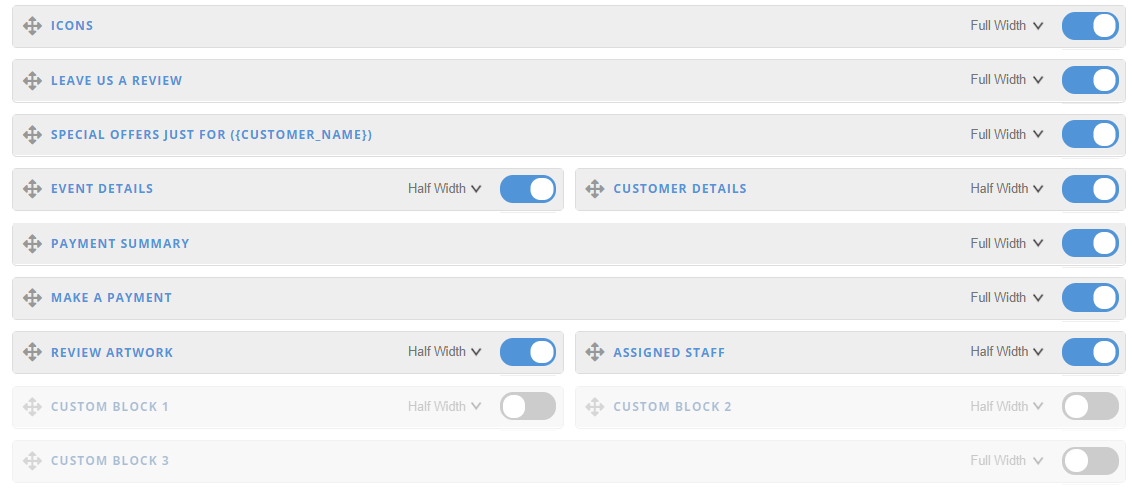
NOTE: If a content block is set up to not show until an action has been made e.g. Staff have been assigned, then the opposite half block will default to full width in the mean time.
What Are The Settings For Each Content Block?
- Icons - You can control which of the below icons you wish to display to your clients in their client portal. Note: If you have enabled the Startscreen icon for example, this will only appear if the client has chosen a start screen for their event.

- Customer Details - This will automatically pull through all completed fields for the customer details captured on the booking form. The title for this content block is translatable.
- Event Details - This will automatically pull through all completed fields for the event details captured on the booking form. The title for this content block is translatable.
- Special Offers (Up-sells) - These up-sells will be displayed based on your Extras settings. You can set a time limit on when you'd like them to start displaying as well as choose your banner colour.
- Make a Payment - This block allows a client to pay off their remaining balances.
- The title is fully translatable.
- You can enable the option to require a signed contract before any payments are made. This will grey out the payment block until that point.
- You can choose to show suggested amounts ie. Deposit, 50% , 100%
- Optionally set a minimum payment amount for manual payments. This reduces the number of micro payments a customer can make on a booking.
- Optionally hide the ability to pay the remaining balance to a certain time before the event date. This is useful for managing cash flow and making sure customers are paying closer to the event date. Please note: This is not the due date, it just hides the payment section.
- Payment Summary - Translate the title of this content block as well as optionally show all of the payments made towards a booking in a separate table.
Review Artwork - This lets your customer see the PNG overlays or branding artwork you have uploaded so they can review it. You can translate the content block title and description.
- Leave us a Review - This content block only appears once the event date has passed. Therefore it's recommended to create a scheduled notification 1 week after the event date, directing them to their client portal to leave a review. See examples of scheduled notifications here.
- You can translate the content description here as well as choose which platforms you'd like to be reviewed on by leaving a URL.
NOTE: We would advise making this a full width section as it isn't displayed until after the event date. Therefore it isn't relying on another half width content block.
- Assigned Staff - You can translate the text here. The data is shown once you have assigned staff to an event and the icons are always centred, depending on how many staff are working.
- Custom Blocks - You can create up to 3 custom blocks, and place them anywhere in your client portal. These can be simple title and description blocks, or by adding some HTML you can make them more dynamic. An example of this is to embed your Calendly Widget code into the Content box.
NOTE: Don't forget to click 'Save Configuration' at the bottom of the page after making any changes
How Does The Client Portal Appear For The Customer?
Below is an example of how the client portal will appear for the customer
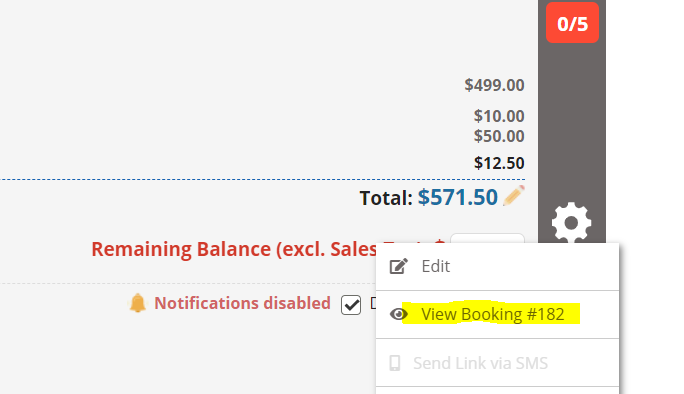
How Do I View A Client's Portal?
To see a client's portal as the customer would see it go to your Bookings List (diary icon), click on the Cog icon on the right hand side of the booking you want to view, and click View Booking.