Setting Up The Template Chooser
Allow customer to choose their photo template design

BoothBook
Last Update hace 2 años
Firstly you need to know how you would like your customers to choose templates. There are currently 3 options we offer.
Option 1 is using your own templates. You can do this through the BoothBook template chooser.
Option 2 is using an external photobooth template chooser such as PhotoboothTemplates.com, this is as simple as copying your code.
Option 3 is using our integration with Photo Booth Talk where you have access to 100's of professional templates.
Watch the below video on how to enable an external template chooser (Option 2)
Written Instructions:
Option 1
- Have your templates ready to upload
- Go to Assets (camera) icon > Template Groups
- Click Add New Template Group, add a Title, this can be "Mirror, Enclosed" etc or "Weddings, Parties" etc OR "Postcard, Strips, Square" etc. Click Save.
- Repeat step 2 until you have all the groups you need.
- Go to Assets > Templates and click Add a new Template
- Drag the Template file in to the Template Image upload box
- Give the Template a Title / ID
- Select the Template Group/s they apply to
- Create Search Terms for each template, these should be separated by a comma. These could be more descriptive, something that a customer might search for eg. balloons.
- Go to your Assets > Extras, add or edit an applicable extra eg. Custom Prints 4x6, and select the check box to Enable Template Chooser.
- As soon as you are ready to have customers use your template chooser, go to Top User Menu > Settings and scroll down to Template Chooser.
- Select BoothBook Template Chooser and tick Enable client portal template chooser link, which will give you three options to choose from to redirect the customer after they have chosen their template.
- You can choose from the options of; Client Portal, Show the Template and Redirect to External URL.
- Once you have selected the option you would like, click Save Configuration.
Option 2
- Go to your Assets > Extras, add or edit an applicable extra eg. Custom Prints 4x6, and select the check box to Enable Template Chooser.
- When you are ready to have customers use your template chooser, go to Top User Menu > Settings and scroll down to Template Chooser.
- Select External Template Chooser and tick Enable client portal template chooser link
- Copy your widget code from your external provider and paste it into the External Widget Code field.
- Click Save Configuration.
Option 3
- Go to Assets > Extras and select 'Add a new Extras product'
- Choose a customer facing title ie. Bespoke Templates
- Choose the Unit Types you wish to add this Extra to.
- Set a price for this extra (please consider this carefully as you will be paying for each template per order if you are not a Photo Booth Talk VIP Member)
- Set an Upsell price if you wish to market to your bookings that didn't choose a template at the time of booking.
- Within Additional Settings, Scroll to the bottom ad ensure Enable Template Chooser is selected.
- Save
- Head to Assets > Extras where all extras will be listed. Find this Extra and ensure you designate an Extras Group to it ie. Branding / Upgrades (if you don't do this, your extra will not appear on your booking form.)
- Now you will need to set your template chooser to Photo Booth Talk. To do this, click here
How it Works
When the customer accesses their client portal, they have a link to select their template.
Customers can be sent a reminder via email to choose their templates (Triggered by an admin via the cog in the bookings list). This email can be updated in Top User Menu > Settings >Translate> Email Templates> Template Request. For further help with updating please click the following link: Here
External Template Chooser
When customers choose a template via an external template chooser, it will depend on the third party widget for how admins are notified of the customer's template details.
Additional Information:
If you are using an external template chooser, the system has no way to know what was chosen as they have no connection to the system. It will not add notes to the admin notes and will not mark the selection as done. You will need to add these manually.
BoothBook Template Chooser
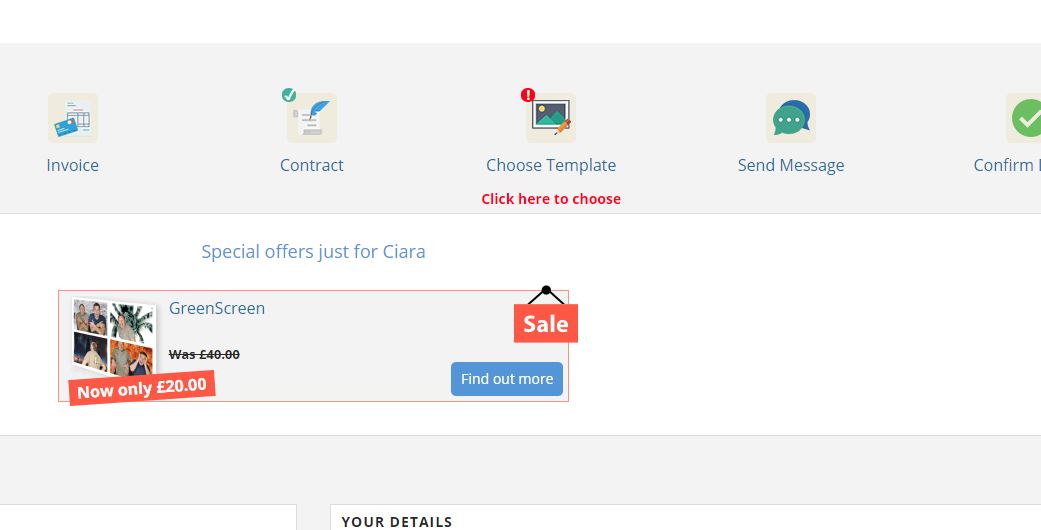
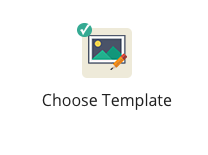
1. For the customer to choose their template they will need to click on the icon Choose Template as shown above. This will then take the customer to a menu where they can select the template they would like to choose, they will need to then select their chosen one. Below is an example of how the menu should appear:

2. Following this once the customer's option of template has been selected it will then appear with the option to add text to the template, enabling customer's to personalise these in accordance with their event.
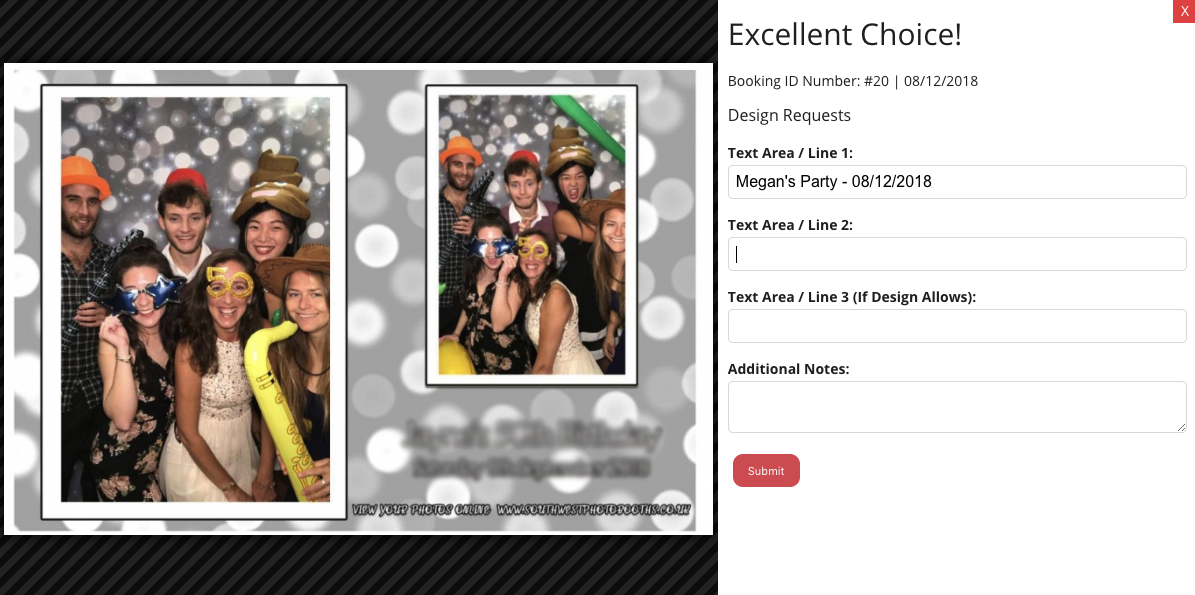
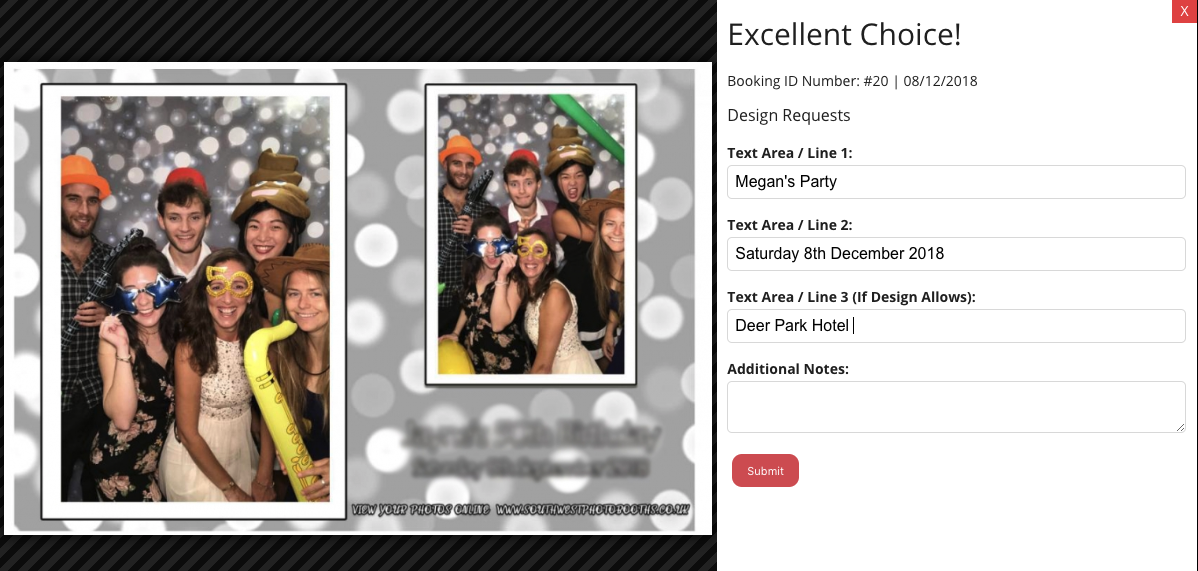
3. After this has been completed and the customer is happy with the text added to their template then the customer will select the Submit button.
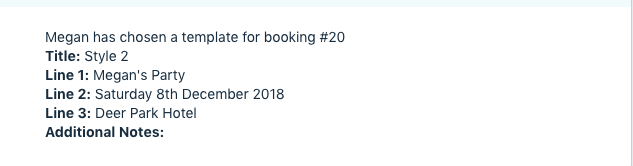
4. When a template has been submitted an email will be sent to the business email address with the customer's requested template details. The email will appear showing the same format as the design request form. Please see below:
5. The customer's status of choosing a template will be updated on their client portal icon with a tick when completed:
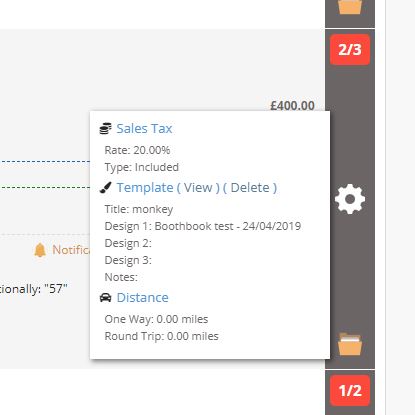
6. Your Bookings list will show the Template details when the folder icon is clicked, where you can view or delete the chosen template if the customer changes their mind: