Sending E-mails after a Webform is Submitted

BoothBook
Last Update 4 years ago
BoothBook allows you to configure e-mails to go out when a webform has been submitted - these could be a simple notification to an admin, or the client - or these could be a specific email only sent if a complex set of rules all validate.
Sending emails after submitting a webform
To add a new email to a webform, you can either click the 3 dots on the "manage webforms" page and click "edit emails" - or you can edit the webform and go to the Emails tab.
The first option you will see will ask you who the recipient of the webform should be.

To send the webform to a custom email address, enter an address manually. (Note: You can send to multiple email address by comma separating them.)
To send to an email address based on the value of a field, you can use a component value.
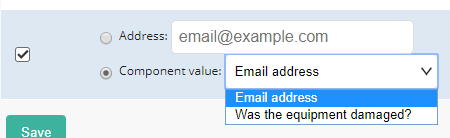
Some examples of using a component value might be sending an email to the email address that was entered by the client, for example....
- One of the email fields is a venue contact, and you want the form to send an automatic introduction email to the venue
- One of the email fields has the customer email in it - and you want to let them know you got their form submission
You can also use a component value for fields like multiple choice options. For example, in the image below - we are asking our staff member to fill out a webform after the event, and we ask them if the equipment was damaged at all during the event.
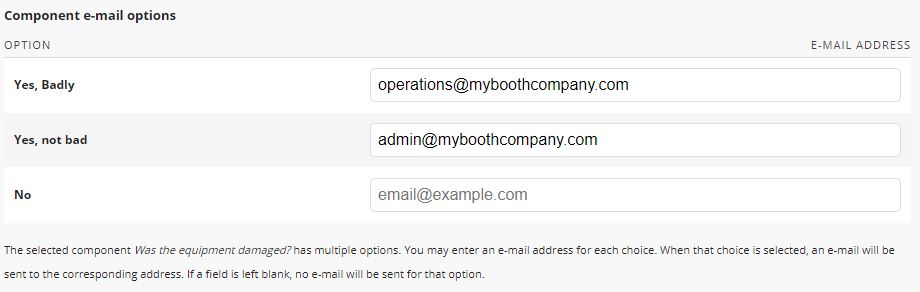
If the staff member answers the question with "Yes, Badly" then the email gets sent to the operations team for immediate action to be taken.
If the staff member answers the question with "Yes, not bad", then the admin gets notified about the general wear and tear.
If the staff member answers the question with "No", then we don't need to send any emails.
Configuring the email subject and "From" details
Next, we can control aspects like the Subject, From address and From Name.
When creating our subject, we can use the default text, set our own custom one (yes, you can use submission variables!), or choose a value from a submitted component.
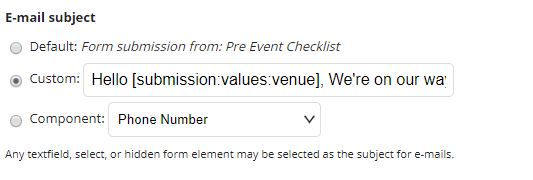
We can do the same for the address and name fields.
Configuring the email content
Next, we can control the content of the email using the values that were submitted.
In the example below, we have the default submission text in there. This will show the date it was submitted, and give us all of the submitted values that are ticked in the "Included Email Values" below.
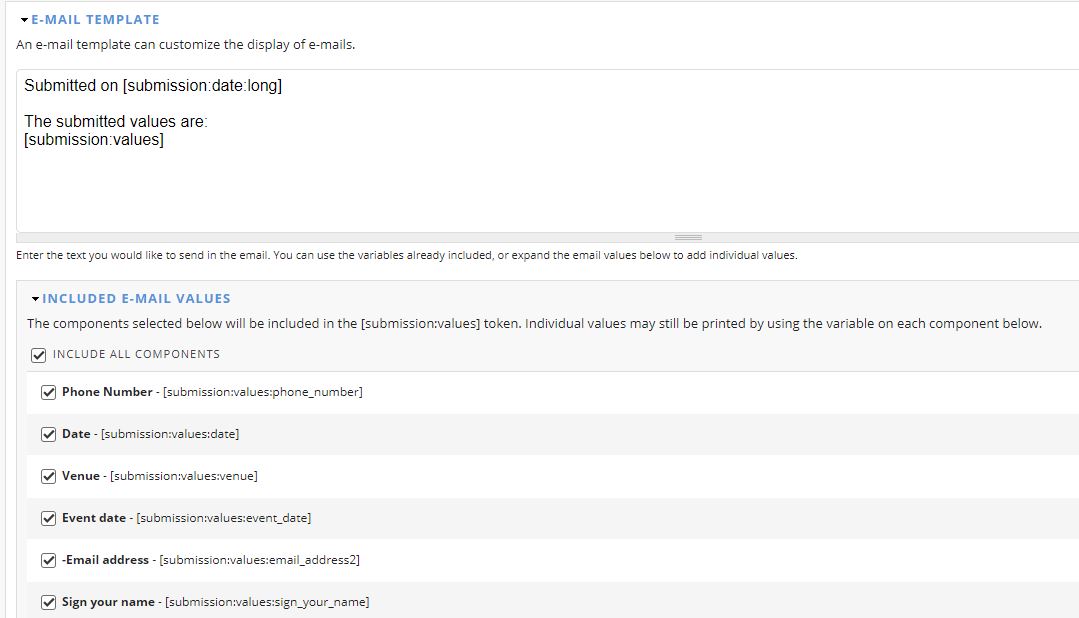
Alternatively, we can take the individual values from each field, and use those if we want to. (These can also be used in the email subject)
Other submission variables that can be used
The main submission values can be found in the "Included Email Values" section, and they look like this.... [submission:values:phone_number]
The values in this section will change based on which fields you add into your webform, but other variables are also available, such as...
Dates
Long format - [current-date:long] - A date in 'long' format. (Thursday, 4 April, 2019 - 13:57)
Medium format - [current-date:medium] - A date in 'medium' format. (4 April, 2019 - 13:57)
Month and Year - [current-date:month_and_year] - A date in 'month_and_year' format. (April 2019)
Raw timestamp - [current-date:raw] - A date in UNIX timestamp format (1554382623)
Short format - [current-date:short] - A date in 'short' format. (04/04/2019 - 13:57)
Written - [current-date:written] - A date in 'written' format. (Thursday 4 April 2019)
You can also provide dates in a custom format....
Custom format - [current-date:custom:?] - A date in a custom format. See the PHP documentation for details. e.g. "d-m-Y" would print "23-04-2019"
Other Data
IP address - [submission:ip-address] - The IP address that was used when submitting the webform.
Advanced Value Handling
Webform submission values are usually available in this format.... [submission:values:?] (with the ? replaced by the form key)
You can also append:
:nolabel
for the value without the label (the default). e.g. [submission:values:phone_number:nolabel] might print "01234567890"
:label
for just the label. e.g. [submission:values:phone_number:label] might print "Phone Number"
:withlabel
for both the label and value together. e.g. [submission:values:phone_number:withlabel] might print "Phone Number: 01234567890"