How do I use Emails in Webforms?

BoothBook
Last Update hace 2 años
Emails in Webforms is used to notify a certain contact (ie. business owner) of a webform submission so they can take action based on the information given if necessary.
Setting up your Email Notifications in Webforms
1. Choose which email type you want the submitted forms to be sent to
Please note once you have set up an email form and saved, you can select multiple 'email to' addresses. ie. You (the business owner) AND the customer will receive the submitted form/s via your Emails dashboard if you've set up more than one contact type for a form.
a) Booking - Customer Email
This dynamically pulls through the customer/staff/admin email address that submitted the form.
b) Booking - Assigned Staff
This automatically pulls through the emails of all assigned staff to that event and emails them with the form.
*Please note this is only useful when an event has an assigned staff member added to the booking before the webform is scheduled to send. If not, the attendant will not be aware of this webform.*
c) Address
Manually add the email address/s. We recommend this is your business email to ensure they are all in one place however you can add multiple emails ie. an admin or business partner by inserting a comma as a separator.
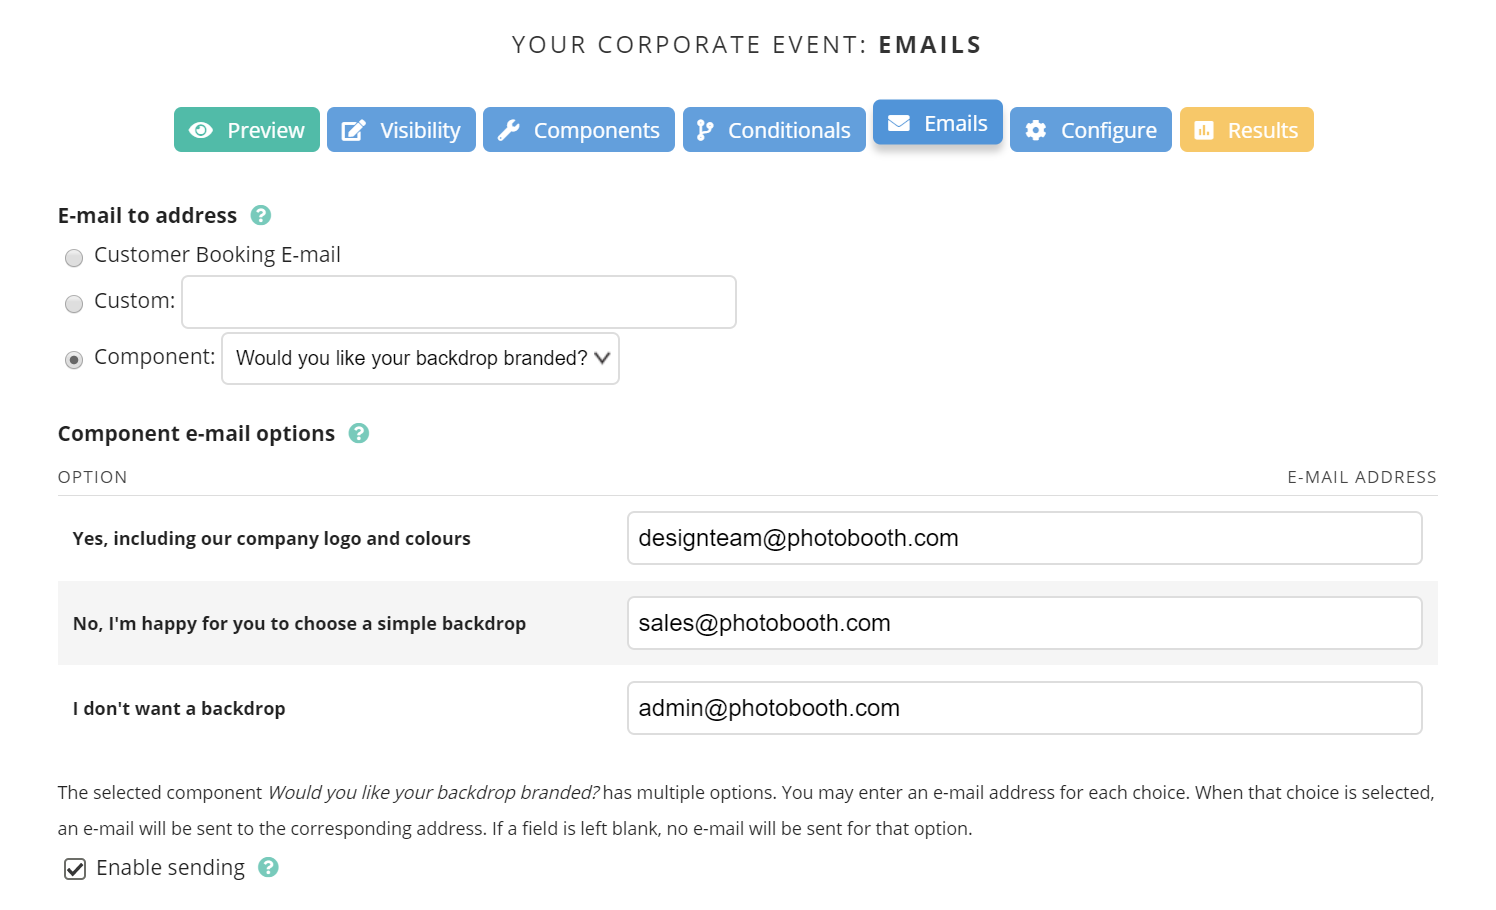
d) Component Value
If you are a large business and wish to direct component values to certain staff members, this is a useful tool to use. For example, you have a corporate client and send them a pre-event questionnaire. Your component is 'Would you like your backdrop branded?'' and your customer can select one of the three values. Depending on the value they select, a specific staff member will receive that webform submission. See example below:
2. Click the Enable sending box
3. Choose your email subject
a) Default
This automatically pulls through the webform title.
b) Custom (advanced settings)
For example, if its a damage report filled out by a staff member, you want to know what was damaged/how bad it was damaged immediately. Therefore you want to stand out in your inbox so by adding 'IMPORTANT:' followed by either a manual message ie. 'damages to equipment' or a variable ie. [submission:values:what_was_damaged]. Your variables can be found at the bottom of the page under Included e-mail values.
c) Component (advanced settings)
This will give you the option to choose a component question (ie. What was damaged?) on the webform and it will pull through the value (answer) into the subject line. For example, Subject line = Damage : Photobooth Frame
4. Choose the email from address
This simply allows you to choose which email address you want the address to be sent from. This is usually the business address (default) as it's coming via your website. However you have the option to change this to a Custom address or Component.
5. Choose the email from name
a) Default
This pulls through your business name
b) Custom (advanced settings)
You can personalise this to suit your needs. For example a damage report is being filled out by a staff member so you can add in 'Staff Report' as your from name.
c) Component (advanced settings)
Like above, you can pull through your component value (answer) as your email from field by selecting the question.
6. Finalise your email template
This only needs to be a simple template giving you the information you need to take action/finalise your booking. Our default template includes the submission date, components and component values.
(You may already have additional information in your email subjects etc.)
7. Choose your email values
Select the values you would like to include in your email. If you don't want to receive empty values, make sure you tick the exclude empty components box.
Managing my Webform emails
Go To > Top User Menu > Settings > Webforms > Select the webform you want to manage > Actions (far right column) > Email Notifications
- If you have set up more than x1 email notification for that webform, they will all be listed on this page. It will display the Email to, Subject & From information for each of the set ups.
- If the box is ticked on the left, this means those recipients will receive emails after each submission. This is where you can select multiple emails for that webform submission.
- To create a NEW email notification for that webform, you will see a pre-ticked row at the bottom of this page. Choose your 'email to' option (you can change this on the next stage) and click 'Add' to begin creating.
- To duplicate an email notification, click Clone on the right column under Operations
- To edit an email notification, click Edit on the right column under Operations
- Make sure you always Save your changes after any change on your dashboard or within your email notification set ups.
Click here to watch the beginning to end process of creating a webform.