How to use the BoothBook Software as an Attendant

BoothBook
Last Update 4 years ago
In this article you can find all the information needed to navigate around BoothBook. With BoothBook you can manage your working rota at ease, as well as be in quick reach of the details needed for the bookings your assigned to.
Getting started with your Attendant Account
- First you will need to have your Attendant account, this will be created by the Admin i.e the business owner/admin.
- Once your Attendant account has been created you will be notified of this via email.
- The Admin will then send you a link to log into your account or you can log into your account by going to the homepage of the Business to find a link to staff at the bottom of the page. This will take you to your account log in.
- To log in you will need your username and password, the log in will also give you the option to change your password. To edit your Profile at any time, go to Person Icon > My Profile.
- Once you have logged in you will see your Overview page. See below for more information on the Overview page.
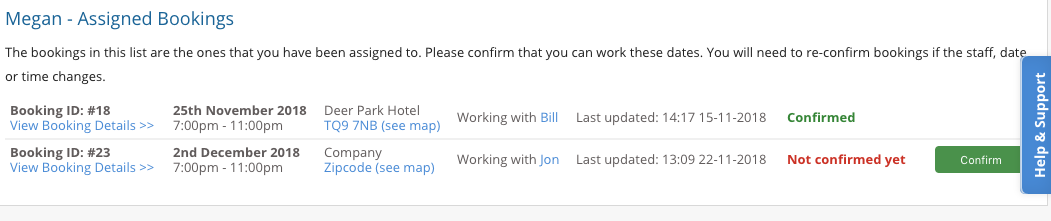
- To see your assigned bookings, go to Person Icon > My Calendar . At the top it will show you a brief description of that event including the booking I.D number, time of the event, when the booking was last updated and if other attendants have been assigned to this event also.
- You will also find a Confirm button located at the right side of the booking which is to be selected when confirming you can work the assigned event.
- By selecting a booking you have been assigned to this will open the booking to show you all the details needed in preparation to work i.e type of event, location and time of the event.
As an Attendant you are also able to add dates when you are not available to work eg. Holidays etc. Once logged in, you will arrive on your dashboard and you can see (depending on permissions set) information such as latest bookings, who else is currently online and any bookings that you are assigned to work.
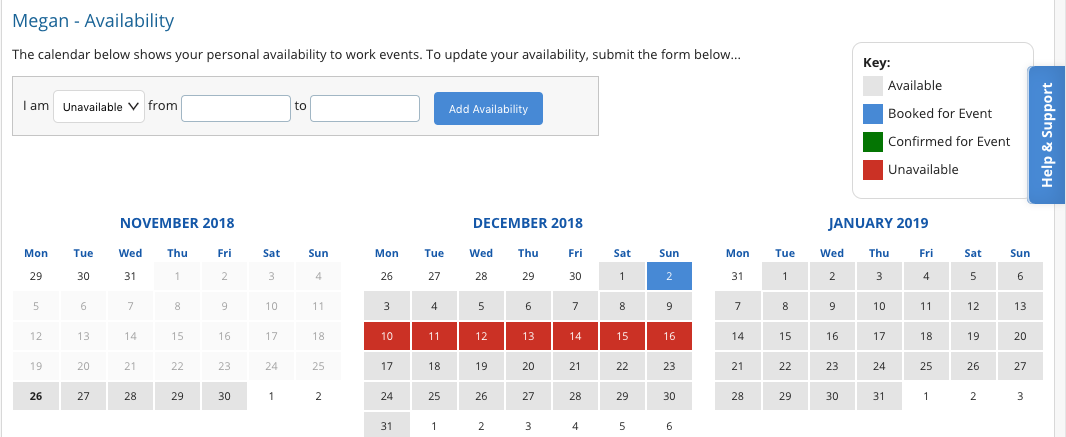
- Scroll down to the Availability calendar, and there you are able to select Available/Unavailable and the applicable date range
- Click the Add Availability button to set it on the calendar and it will be saved automatically.
- If you attempt to add an Unavailable date range where you are already assigned to work an event, a message will show (example image below).
- For example once you have added the dates in which you are unavailable, this will then highlight these dates on the calendar to correspond with the key colour chart below. So as you can see on the screenshot, red reflects the action unavailable which has now highlighted the dates I imputed earlier on.
- As you can also see the key colour chart will also show on the calendar when you are booked for an event, have confirmed an event as well as when you are available.
Request to Work
If your Admin has enabled all their Attendants to be able to view all Bookings when logging into their accounts, then you have the option to Request to Work on any bookings available.
- If you would like to request to work on a booking then simply select the Request to Work button.
- Once this has been selected underneath the Booking ID you will see a section called 'Work Requests' here you will see the names of Attendants who have asked to work this booking.
- When the Admin is then assigning Attendants to that booking they will be able to see those attendants who have requested to work and they can the add them to the event.
- The Attendant will then receive their notification to explain they have been assigned to an event and will need to confirm this.
Overview Page
As a staff member, you will land on our Overview page as soon as you log in. This gives you a presentable summary of your assigned tasks, you recent activity on BoothBook, and all latest bookings (visibility to these depends on permissions set by your admin) Within the list of latest bookings it will display next to the booking ID if you are confirmed to work that event OR click on the booking number if you would like to request to work that event (permissions depending).
To get back to your overview page go to Person Icon > My Overview
Profile
To edit your profile go to Person Icon > My Profile. Here you can add/edit the below:
- Notifications - choose if you would like to receive SMS and/or Email notifications when assigned to an event.
- Account Settings - if you need to edit your password and email address
- Picture - You can set yourself a profile picture. This makes its easier when you are being assigned to Tasks and Bookings.