How to set up Additional Hours in Extras

BoothBook
Last Update 4 years ago
When customers are booking a service with your business, they may ask to extend the time you are providing that service for at their event. So the best way to offer extended time to customers for the packages they are booking, is to add Additional Hours in Extras. Customers can simply add these alongside their chosen packages as Extras.
Please follow the steps below:
1. You will need to go to Assets>Extras Groups>Add a New Extras Group.
2. Next you can title your Extra Group, so this would be called Additional Hours.
3. Underneath the title field, you can then add some description of what this Extra Group offers. You can choose to make this group required by selecting the checkbox next to the option Make Group Required which means that when a customer is booking with you, an Extra from this Group must be selected in order for them to continue with the booking. If you do not want this to become a requirement when booking, simply leave this checkbox blank. The next field offers to disable the group so this should only be selected if you wish to make this Extras Group unavailable to customers. The Weight field enables you to choose the placement of your Extras Group in the display of all your Extras Groups.
4. Once you have finished completing the above fields, select Save.
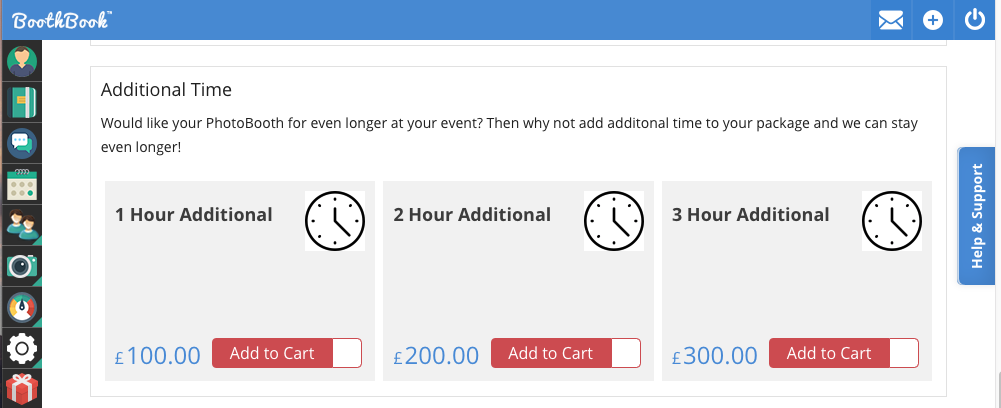
5. Now your Extras Group has been created, you will need to add Extras to the group. These Extras will consist of all the different Additional times you can offer. Go to Assets>Extras>Add a New Extras Product.
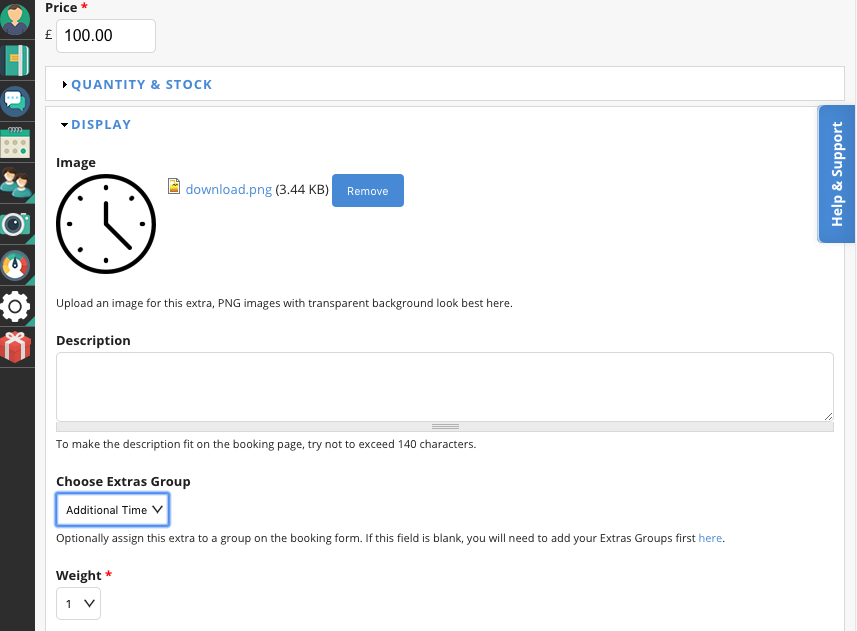
6. You can title your first Extra, so i.e 1 Hour Additional. Following this you will then need to select a Unit you would like this Extra to be available for so if you would like this Extra to be an option for all your Units, you can select all of these as options. Next you can add a price for this Extra, so i.e £100. You also have the option to add the Quantity and Stock for this Extra however for the Additional time Extra you can leave this blank. The Display field enables you to an Image for this Extra, so you could choose a time or clock icon to represent this. You can add a description for this Extra and then choose the Extras Group you would like your 1 Hour Additional Extra to be included in. So you would choose the group you created earlier Additional Hours, choose the Weight of your extra to direct where you would like this displayed amongst your other extras in this group. So for the first Extra simply choose the weight to be 1.
7. The Upsell field after this can enable you to offer this Extra at a discounted price, this will push this Extra forward when customers are booking. The last field Additional Settings allows you to limit the Extra by event type or package or to use the template chooser.
8. Once all the above fields have been created, you can select Save.
9. You can create as many Additional Time Extras as you would like, just repeat the above steps until you have included all the times you would like to offer under that Extras Group. Once you have finished adding to your Extras Group this will appear on your booking page for customers to browse.